Are you ready to transform your kitchen scraps, yard waste, and other organic materials into a powerhouse soil amendment, all while making a profound positive impact on the environment? Embarking on the journey of composting for beginners might seem like a complex task, but it is, in fact, an incredibly rewarding and surprisingly straightforward process. This ultimate step-by-step guide will demystify how to compost, offering clear, actionable steps, expert composting tips, and invaluable insights to help you succeed from day one.
Whether you have a sprawling garden, a small balcony, or even just an indoor living space, anyone can learn how to compost and contribute to a healthier planet and a more vibrant garden. Say goodbye to reliance on chemical fertilizers and significantly reduce landfill waste; get ready to create your own “black gold” with our comprehensive beginners guide to composting. This article is your definitive resource to not just start, but truly master compost creation, turning everyday waste into a gardener’s most prized possession.
The Magic of Composting: What It Is & Why It Matters
Before we dive into the practicalities, let’s unlock the magic behind composting and understand why it’s a game-changer for your garden, your wallet, and the environment.
Understanding the Natural Cycle: What is Compost?
At its core, compost is nature’s ultimate recycling system. It’s the controlled decomposition of organic materials by a bustling community of beneficial microorganisms, fungi, insects, and worms. These microscopic and macroscopic workers diligently break down everything from vegetable peels to fallen leaves into a dark, crumbly, earthy-smelling substance known as humus or finished compost. This nutrient-dense product is teeming with essential plant nutrients and beneficial microbes – the perfect food and conditioner for your plants and soil. It’s a natural, sustainable cycle that transforms what many consider waste into a highly valuable resource.
Unleashing the Benefits: Why Every Beginner Should Compost
The reasons to start composting are numerous and impactful, extending far beyond just cultivating beautiful plants:
- Environmental Stewardship: Composting dramatically diverts a significant portion of household waste (kitchen scraps and yard trimmings) from landfills. When organic matter decomposes in a landfill, it often does so anaerobically (without oxygen), producing methane, a potent greenhouse gas that contributes significantly to climate change. Aerobic composting, on the other hand, minimizes these harmful emissions.
- Enrich Your Soil Naturally: Compost is a phenomenal soil conditioner, often referred to as “black gold.” It improves soil structure, making heavy clay soils more workable and helping sandy soils retain vital water and nutrients. It enhances drainage and aeration, and introduces a diverse microbial community that is crucial for robust plant health and nutrient cycling.
- Boost Plant Health & Vigor: By providing a slow-release source of essential macro- and micronutrients, compost fosters stronger, healthier plants that are naturally more resistant to pests and diseases. It acts as a natural, gentle fertilizer that won’t burn your plants like some synthetic alternatives.
- Save Money & Resources: Reduce your reliance on expensive store-bought fertilizers, potting mixes, and soil amendments. Your compost pile becomes a continuous, free, and renewable source of high-quality garden input.
- Conserve Water: Soils rich in organic matter (thanks to compost) have a significantly higher water-holding capacity. This means your garden will require less frequent watering, saving water and effort.
- Reduce Chemical Use: A thriving soil ecosystem, nurtured by compost, reduces the need for chemical pesticides and herbicides, leading to a healthier garden and ecosystem.
Choosing Your Composting Adventure: Methods for Every Space
One of the first and most exciting steps in your composting for beginners journey is selecting the right method for your space, lifestyle, and the volume of waste you produce. There’s no single “best” way to compost; the ideal method seamlessly integrates into your specific needs. Understanding your options is a key composting tip for long-term success.
1. Traditional Backyard Composting: The Classic Approach
This is the most traditional and often the most cost-effective option, ideal for those with a small to large yard. You simply create a freestanding pile or contained bin directly on the bare earth.
- Pros: Cost-effective (can be free), handles large volumes of yard waste, allows natural access for earthworms and beneficial soil organisms, produces significant amounts of compost.
- Cons: Can be less aesthetically pleasing, might attract pests if not managed properly, requires physical turning with a pitchfork or aerator.
- Best For: Gardeners with ample outdoor space and a good amount of yard waste, those seeking a truly hands-on approach to how to compost.
Hot Composting vs. Cold Composting
Within backyard composting, you can choose between “hot” and “cold” methods:
- Hot Composting: This method aims for rapid decomposition. It involves maintaining a specific carbon-to-nitrogen ratio, regular turning, and consistent moisture to generate high temperatures (130-160°F or 55-70°C). These temperatures speed up decomposition and can kill weed seeds and pathogens. Requires more attention and effort.
- Cold Composting: This is the “set it and forget it” method. You simply add materials to a pile or bin over time, and decomposition occurs slowly at ambient temperatures. It takes longer (6 months to 2 years) but requires minimal effort.
2. Compost Bins and Tumblers: Contained Convenience
For those who prefer a more contained system or have smaller outdoor spaces, manufactured bins and tumblers are excellent choices. Bins can be simple plastic units or multi-chamber systems, while tumblers rotate to easily mix the compost.
- Pros: Tidy appearance, helps deter pests, tumblers make turning effortless, some bins offer multiple chambers for continuous composting, good for smaller yards or patios.
- Cons: Higher initial cost, capacity can be limited compared to large piles, tumblers can sometimes dry out faster.
- Best For: Smaller yards, urban settings, those who prefer less physical labor for turning, anyone looking for a neat and efficient way to how to compost.
3. Vermicomposting: Worms Do the Work
Also known as worm composting, this fascinating method uses specific types of worms (most commonly Red Wigglers or Eisenia fetida) to break down food scraps into nutrient-rich worm castings (worm poop). It’s often done in a multi-tiered bin that can be kept indoors or outdoors.
- Pros: Can be done indoors (garages, basements, even under the sink), compact, produces incredibly rich compost (worm castings) and “compost tea” (liquid fertilizer), minimal odor if managed correctly.
- Cons: Requires managing living creatures, sensitive to temperature extremes, not ideal for large volumes of yard waste (worms prefer food scraps), requires occasional harvesting of castings.
- Best For: Apartment dwellers, those with very small outdoor spaces, or anyone wanting highly potent compost for houseplants, seedlings, and concentrated garden boosts. This is an excellent beginners guide to composting for urbanites.
4. Other Methods for Comprehensive Composting
While the above are most common, especially for composting for beginners, here’s a brief mention of other effective techniques:
- Bokashi Composting: An anaerobic (oxygen-free) fermentation process that “pickles” food scraps (including meat, dairy, and cooked foods typically avoided in other methods) using inoculated bran. The fermented material then needs to be buried in the garden or added to a regular compost pile to fully break down. It’s a pre-composting step.
- Trench Composting: Simply burying food scraps directly into your garden beds. The soil organisms break them down over time, enriching the soil right where it’s needed, out of sight. Ideal for direct garden enrichment.
- Electric Composter/Food Recycler: These countertop appliances rapidly break down food scraps (sometimes even bones) using heat and pulverization, significantly reducing their volume and sterilizing them. The output is a soil amendment, not true compost, but it’s an excellent way to pre-process materials for a traditional pile or reduce kitchen waste.
Essential Steps to Successful Composting: Your “How-To” Guide
Now that you’ve chosen your method, let’s get into the practical how to compost steps. This section provides a clear, actionable beginners guide to composting your way to abundant “black gold.”
Step 1: Choosing the Right Location (and Container Setup)
Location is crucial for successful and hassle-free composting.
- Bare Earth is Best (for piles): If you’re building an open pile or using a bottomless bin, choose a spot directly on bare earth. This allows beneficial microorganisms, fungi, and earthworms to easily colonize your pile, speeding up decomposition and improving drainage.
- Shady Spot is Ideal: A location that gets some shade, especially during the hottest parts of the day, helps prevent your compost from drying out too quickly and keeps the microbial activity stable. Too much direct sun can bake it.
- Good Drainage: Ensure the spot isn’t prone to waterlogging. A soggy pile will become anaerobic and smelly.
- Accessibility & Convenience: Choose a spot that’s convenient for adding material and for turning, but also not directly next to your main living areas due to potential smells (though a well-managed pile rarely smells bad). Consider proximity to your garden for easy use of finished compost.
- For Bins/Tumblers: Place them on a level, stable surface, ideally in a shaded area. For worm bins, a consistent temperature (55-77°F or 13-25°C) is key, so a garage, basement, or shaded patio is perfect.
Step 2: Laying the Foundation (for Piles/Bins)
For a new compost pile or bin, a good foundation is like building a sturdy house – it sets the stage for success.
- Lay down a 4-6 inch layer of coarse, “brown” materials like twigs, wood chips, straw, or even a few old branches. This provides essential airflow at the bottom, helping with drainage and preventing anaerobic conditions (and unpleasant odors). This is a fundamental composting tip.
Step 3: Understanding “Greens” and “Browns” – The Golden Ratio
The secret to effective composting lies in balancing two types of materials: “Greens” (nitrogen-rich) and “Browns” (carbon-rich). Getting this balance right is one of the most important composting tips you’ll ever learn and critical for a speedy, odor-free pile.
- Greens (Nitrogen Source): These materials provide the nitrogen that microorganisms need to thrive, reproduce, and rapidly break down organic matter. They are typically moist, fresh, and tend to break down quickly.
- Examples: Fresh grass clippings, fruit and vegetable scraps, coffee grounds, tea bags, fresh plant trimmings, fresh manure (from herbivores), green leaves, kitchen scraps.
- Browns (Carbon Source): These materials provide the energy source for the microorganisms and add bulk, structure, and aeration to the pile. They are typically dry, woody, and break down slower, preventing the pile from becoming dense and soggy.
- Examples: Dry leaves, straw, hay, shredded newspaper (black ink only), shredded cardboard (non-glossy, torn into small pieces), wood chips, sawdust (from untreated wood), dry plant stalks, pine needles.
The Golden Ratio: Aim for a ratio of approximately 2-3 parts brown material to 1 part green material by volume. Don’t stress about being exact; composting is more of an art than a precise science, and you’ll develop a feel for it. Too much green leads to a smelly, slimy pile; too much brown leads to a slow, dry, inactive pile.
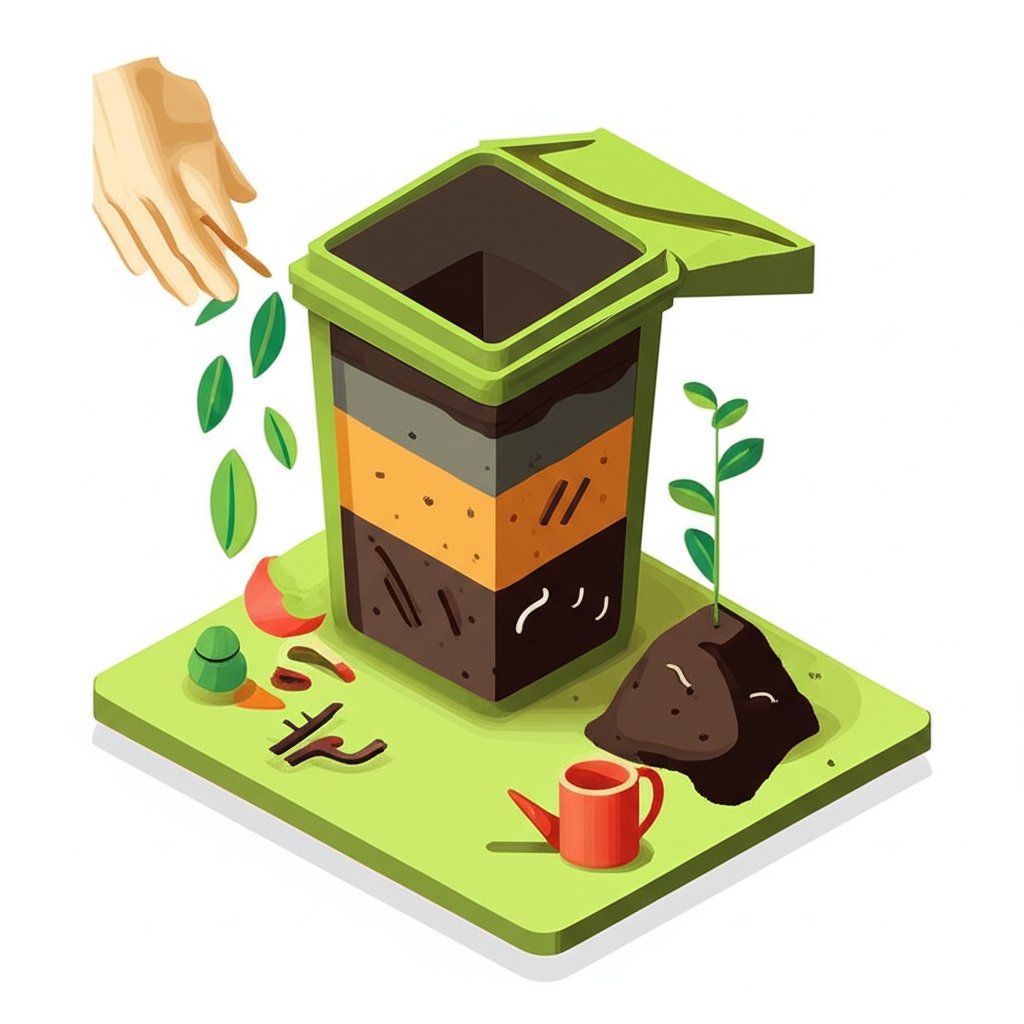
Step 4: Layering Your Materials Effectively
With your foundation set and your greens and browns understood, it’s time to build your compost pile or fill your bin. This methodical approach is key to how to compost efficiently.
- Start with Browns: Begin with a 6-8 inch layer of brown materials.
- Add Greens: Follow with a 3-4 inch layer of green materials.
- Repeat & Mix: Continue alternating layers. As you add new layers, try to mix them slightly with the layer below using a pitchfork or aerator. This ensures good distribution of nutrients and microbes.
- Chop It Up: Smaller pieces break down significantly faster. Consider chopping larger kitchen scraps, shredding leaves, or tearing cardboard into smaller pieces (1-2 inches is ideal) before adding them. This is a vital composting tip for speeding up the decomposition process.
Step 5: The Role of Water, Air, and Heat
Microorganisms, the workhorses of compost, need oxygen, moisture, and appropriate temperatures to do their job efficiently. Neglecting these elements is a common pitfall for composting for beginners.
- Moisture: Your compost pile should feel consistently like a damp, wrung-out sponge. Too dry, and decomposition slows to a crawl. Too wet, and it becomes anaerobic, dense, and potentially smelly. Lightly water each layer as you build your pile, and monitor it regularly. During dry spells, you may need to add water with a hose, and during wet periods, you might need to add more browns or cover the pile.
- Aeration (Air): Oxygen is absolutely essential for aerobic decomposition. Without it, your pile becomes dense, soggy, and develops foul odors.
- Turning: Regularly turning your compost pile with a pitchfork or compost aerator introduces oxygen and mixes materials, ensuring even decomposition. For an active, “hot” pile, aim to turn it every few days. For a slower, “cold” pile, every week or two is sufficient. Tumblers simply need a few spins.
- Heat (for Hot Composting): A healthy, active compost pile will naturally generate heat in its core (130-160°F or 55-70°C). This heat is a sign that microorganisms are vigorously working. Use a compost thermometer to monitor if you’re aiming for hot compost. If the pile isn’t heating up, it likely needs more greens, more moisture, or more turning.
Mastering the Art of Composting: Advanced Tips & Troubleshooting
Even with the best intentions, composting for beginners might encounter a few bumps. Understanding what works, how to optimize your pile, and how to swiftly fix problems will make your journey much smoother and more successful. These composting tips will elevate your game.
What to Add to Your Compost Pile (and What NOT To)
This is one of the most practical composting tips you’ll learn. Getting it right prevents odors, pests, and unwelcome pathogens, ensuring a safe and effective compost product.
Compost DO’s (Green Materials – Nitrogen-rich):
- Fruit and vegetable scraps (peels, cores, bruised portions)
- Coffee grounds and filters
- Tea bags (remove plastic staples if present)
- Fresh grass clippings (in thin layers to prevent matting)
- Garden trimmings (leaves, spent flowers, healthy plant matter)
- Eggshells (crushed for faster breakdown)
- Expired spices or grains
- Hair and pet fur (from herbivores like rabbits or guinea pigs)
- Manure from herbivores (cows, horses, chickens – ensure it’s aged or hot composted)
- Seaweed (rinse off excess salt)
Compost DO’s (Brown Materials – Carbon-rich):
- Dry leaves
- Straw and hay (untreated)
- Shredded newspaper (black ink only, avoid color pages or glossy inserts)
- Cardboard (torn into small pieces, remove tape/labels)
- Sawdust and wood chips (from untreated wood, add sparingly as they break down slowly)
- Paper towels and napkins (if not heavily soiled with oils/chemicals)
- Nut shells (crushed for faster breakdown)
- Cotton rags and natural fibers (torn into small pieces)
- Corn cobs and stalks (chopped small)
Compost DON’Ts (Materials to AVOID in most home compost piles):
- Meat, poultry, fish, bones: Attract pests (rats, raccoons, flies), cause strong putrid odors, and can carry harmful pathogens that typical home compost temperatures won’t destroy.
- Dairy products (milk, cheese, yogurt): Attract pests and create foul odors.
- Fats, grease, oils: Attract pests, slow decomposition, create odors, and can coat other materials, preventing breakdown.
- Diseased plants: Can spread pathogens and fungal spores back into your garden when you use the finished compost.
- Weeds that have gone to seed or invasive weeds: Seeds can survive lower compost temperatures and sprout in your garden, creating more work.
- Pet waste (especially from carnivorous animals like dogs and cats): Contains harmful pathogens (e.g., E. coli, roundworms) that typical home composting temperatures won’t reliably destroy, posing health risks.
- Pesticide-treated plants: Introduce harmful chemicals into your compost and, subsequently, your garden.
- Coal ash or charcoal briquettes: Can contain heavy metals or other harmful substances. Wood ash from untreated wood is generally fine in moderation.
- Plastics, metals, glass: Non-biodegradable and will simply remain in your compost.
- Synthetic fabrics: Non-biodegradable.
Maintaining Your Compost: The Key to Consistent “Black Gold”
Consistent and mindful care ensures a healthy, active compost pile. This is where many composting for beginners guides often fall short, but it’s crucial for reliable results.
- Regular Turning: As mentioned, turning introduces oxygen, which is vital for aerobic microorganisms. For a highly active, hot pile, turn it every few days. For a slower, passive pile, every week or two is fine. If using a tumbler, just give it a few spins every day or two. Turning also helps distribute moisture and microbes evenly.
- Moisture Checks: Stick your hand into the pile; it should feel consistently damp, like a thoroughly wrung-out sponge. If it’s dry, add water slowly with a hose while turning. If it’s too wet, add more dry brown materials and turn more frequently to aerate it.
- Cover Your Pile: A tarp, wooden lid, or even a thick layer of straw or dry leaves can help retain heat and moisture, prevent heavy rain from waterlogging the pile, and deter pests. It also helps maintain a more stable core temperature, which is especially useful for hot composting.
- Chop New Additions: Continue to chop or shred new materials (especially kitchen scraps and larger yard waste) before adding them. This exposes more surface area to microbial activity, significantly accelerating decomposition.
Common Compost Problems and Quick Fixes
Don’t be discouraged if your compost isn’t perfect right away. Most issues have simple solutions, and learning to troubleshoot is a valuable composting tip.
- Smelly Pile (Ammonia or Rotting Odor):
- Cause: Too much green (nitrogen-rich) material, too wet, or not enough air (anaerobic conditions). The ammonia smell indicates excess nitrogen escaping.
- Fix: Add more dry brown materials (dry leaves, shredded cardboard, straw), turn the pile thoroughly to introduce oxygen, and reduce watering.
- Compost Not Heating Up (Slow Decomposition):
- Cause: Too dry, too much brown material, pile is too small (needs critical mass of at least 3x3x3 feet for good heat retention if an open pile), or not enough nitrogen.
- Fix: Add more green material, add water (make it damp!), ensure the pile is of sufficient size, and turn it to introduce oxygen.
- Attracting Pests (Rodents, Insects, Flies):
- Cause: Adding forbidden items (meat, dairy, oils, cooked foods), uncovered food scraps left on the surface, or an excessively wet/smelly pile.
- Fix: Stop adding forbidden items. Bury food scraps deeply within the pile’s center each time you add them. Ensure your bin is pest-proof. Turn the pile regularly to keep it active and bury fresh material.
- Slime or Fungus:
- Cause: Too much moisture, lack of air.
- Fix: Add dry brown materials, turn the pile thoroughly to aerate.
- Pile is Dry and Crumbly:
- Cause: Not enough moisture.
- Fix: Add water, especially while turning, until it reaches the “damp sponge” consistency.
- Ants in Compost:
- Cause: Pile is too dry and possibly too hot in spots, attracting ants seeking shelter.
- Fix: Moisten the pile thoroughly and turn it. Ants dislike damp, disturbed environments.
Harvesting Your Black Gold: When & How to Use Finished Compost
After weeks or months of nurturing, turning, and monitoring, the moment arrives: harvesting your “black gold.” This is the ultimate reward of learning how to compost.
Knowing When Your Compost is Ready
Finished compost should possess these key characteristics, making it safe and beneficial for your plants:
- Appearance: Dark brown, almost black, and crumbly, resembling rich, healthy soil.
- Texture: Fine and uniform, with most original materials unrecognizable. You might find a few small twigs, which is perfectly normal.
- Smell: Earthy, like a forest floor after rain, or fresh garden soil – not sulfuric, rancid, or unpleasant in any way.
- Temperature: Cool to the touch throughout, indicating the active decomposition process has stabilized. If it’s still warm in the center, it’s still actively breaking down and not fully mature.
The Art of Harvesting Compost
Depending on your system, harvesting can be done in a few ways:
- Continuous Systems (Multi-chamber bins): Harvest from the bottom chamber while continuing to add new material to the top.
- Single Batch Systems (Piles, Tumblers): Once the entire pile is ready, you can simply scoop it out. If some material isn’t fully broken down, you can screen it (using a mesh screen) and return the larger pieces to a new compost pile for further decomposition.
How to Use Compost in Your Garden: Unlocking Its Full Potential
Compost is incredibly versatile and beneficial for every part of your garden. Here are just a few composting tips on how to effectively use it:
- Soil Amendment: This is the most common use. Mix 2-4 inches of compost into the top 6-12 inches of your garden beds before planting. This dramatically improves soil structure, nutrient content, and microbial life.
- Top Dressing: Spread a thin layer (1-2 inches) around existing plants, trees, and shrubs. This acts as a slow-release fertilizer, helps retain moisture, suppresses weeds, and protects soil temperature.
- Potting Mix: Create your own high-quality potting mix by blending compost with other ingredients like perlite, vermiculite, and peat moss (or coir). A good starting ratio is 1 part compost to 1 part perlite/vermiculite to 1 part peat/coir.
- Seed Starting Mix: A sifted, fine compost can be an excellent addition to seed-starting mixes, providing gentle nutrients and beneficial microbes for young, delicate seedlings.
- Lawn Care: Spread a thin layer of compost over your lawn (called “compost topdressing”) and gently rake it in. It will enrich the soil, improve drainage, and encourage healthier, lusher grass growth.
- Compost Tea: Steep finished compost in water for a day or two to create a liquid fertilizer rich in nutrients and beneficial microbes. This “tea” can be watered directly into plants or used as a foliar spray.
- New Plantings: When planting new trees, shrubs, or perennials, mix compost into the backfill soil to give them a strong start.
Storing Excess Compost
If you have more finished compost than you can use immediately, simply store it in a covered bin, a separate pile, or even in breathable sacks. Keep it slightly moist to maintain its beneficial microbial life. Avoid storing it in sealed plastic bags, as this can lead to anaerobic conditions.
Conclusion
Congratulations! You’ve navigated our ultimate beginners guide to composting. From understanding the core process and its immense value to selecting the perfect method, mastering the “greens and browns” balance, troubleshooting common issues, and finally harvesting your luscious “black gold,” you now possess the comprehensive knowledge to successfully compost at home. This isn’t just about reducing waste; it’s about actively participating in a natural cycle that enriches your soil, nourishes your plants, and significantly lessens your environmental footprint.
Starting your own compost pile is a profoundly rewarding journey that connects you more deeply with nature’s processes. With these expert composting tips, you’re exceptionally well-equipped to transform everyday kitchen scraps and yard waste into a valuable, free resource your garden will endlessly thank you for. Embrace the simplicity and profound benefits of composting for beginners today